| ANAESTHESIA PEARLS |
| Difficult Airway Society Guidelines | ||||||||||||||||||||||||||||||
| Difficult Airway Society Guidelines for the management of tracheal extubation | ||||||||||||||||||||||||||||||
| Anaesthesia:Volume 67, Issue 3, pages 318–340, March 2012 | ||||||||||||||||||||||||||||||
| Introduction: | ||||||||||||||||||||||||||||||
| Tracheal extubation is a high-risk phase of anaesthesia. The majority of problems that occur during extubation and emergence are of a minor nature, but a small and significant number may result in injury or death. | ||||||||||||||||||||||||||||||
| Problems at extubation: why is extubation hazardous? | ||||||||||||||||||||||||||||||
| 1. Problems related to airway reflexes: | ||||||||||||||||||||||||||||||
| The return of airway reflexes depends on many factors, and may be delayed for some hours after removal of the tracheal tube. In practice, exaggerated, reduced (obtunded) and dysfunctional reflexes may all cause problems. | ||||||||||||||||||||||||||||||
| 2. Exaggerated laryngeal reflexes: | ||||||||||||||||||||||||||||||
| Breath holding, coughing and bucking (a forceful and protracted cough that mimics a Valsalva manoeuvre) are physiological responses to airway stimulation and are associated with increases in arterial blood pressure, venous pressure and heart rate. | ||||||||||||||||||||||||||||||
| Laryngospasm is a protective exaggeration of the normal glottic closure reflex. Laryngospasm is often triggered by the presence of blood, secretions or surgical debris, particularly in a light plane of anaesthesia. Nasal, buccal, pharyngeal or laryngeal irritation, upper abdominal stimulation or manipulation and smell have all been implicated in the aetiology of laryngospasm. | ||||||||||||||||||||||||||||||
| Laryngospasm causes signs of upper airway obstruction (including stridor) that can precede complete airway obstruction and requires an immediate response. If not relieved promptly, laryngospasm may result in post-obstructive pulmonary oedema (also known as negative pressure pulmonary oedema) and hypoxic cardiac arrest. | ||||||||||||||||||||||||||||||
| 3. Reduced airway reflexes: | ||||||||||||||||||||||||||||||
| Upper airway reflexes maintain tone and upper airway patency; laryngeal reflexes protect the lower airway. Reduced laryngotracheal reflexes increase the risk of aspiration and airway soiling. Partial or complete airway obstruction with forceful inspiratory effort generates a significant negative intrathoracic pressure, which opens the oesophagus increasing the risk of regurgitation. | ||||||||||||||||||||||||||||||
| Protective laryngeal reflexes are impaired after tracheal extubation, and may be compromised following airway management with a supraglottic airway device. | ||||||||||||||||||||||||||||||
| This is a particular problem in obese patients and in those with obstructive sleep apnoea (OSA). | ||||||||||||||||||||||||||||||
| 4. Dysfunctional laryngeal reflexes: | ||||||||||||||||||||||||||||||
| Paradoxical vocal cord motion describes a rare condition in which vocal cord adduction occurs on inspiration, and can cause stridor following extubation. It is more common in young females and in those with emotional stress. The condition is often misdiagnosed and treated as laryngospasm or bronchospasm. The diagnosis can only be made by direct observation of the vocal cords, and responds to treatment with anxiolytic, sedative or opioid agents. | ||||||||||||||||||||||||||||||
| 5. Depletion of oxygen stores at extubation: | ||||||||||||||||||||||||||||||
| Various factors that contribute to rapid depletion of oxygen stores and a reduction in arterial oxygen saturation are summarized: | ||||||||||||||||||||||||||||||
|
||||||||||||||||||||||||||||||
| 6. Airway injury: | ||||||||||||||||||||||||||||||
| Injury to the airway may be the result of direct trauma following surgical or anaesthetic intervention, or it may be indirect due to subsequent bleeding, swelling or oedema. | ||||||||||||||||||||||||||||||
| Managing extubation: | ||||||||||||||||||||||||||||||
| Extubation is an elective process, and it is important to plan and execute it well. | ||||||||||||||||||||||||||||||
| The guidelines describe the following four steps: | ||||||||||||||||||||||||||||||
|
||||||||||||||||||||||||||||||
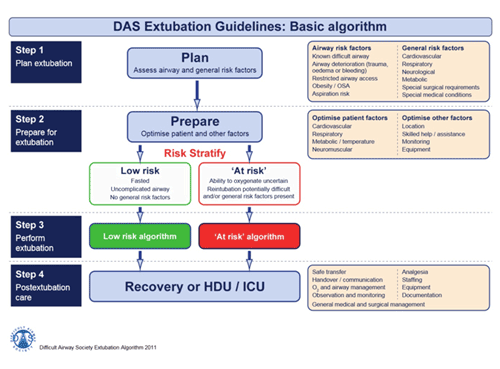
| The DAS extubation guidelines: | ||||||||||||||||||||||||||||||
| I. DAS extubation guidelines: basic algorithm. | ||||||||||||||||||||||||||||||
 |
||||||||||||||||||||||||||||||
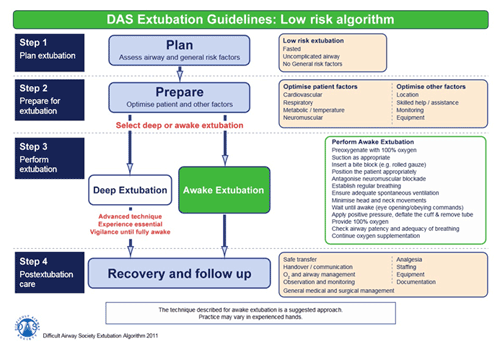
| 2. DAS extubation guidelines: ‘low-risk’ algorithm: | ||||||||||||||||||||||||||||||
 |
||||||||||||||||||||||||||||||
|
||||||||||||||||||||||||||||||
|
||||||||||||||||||||||||||||||
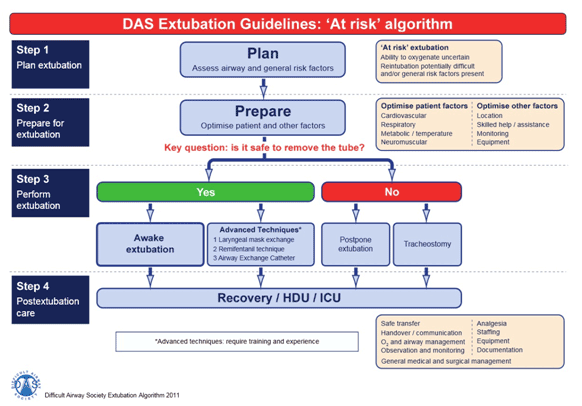
| 3. DAS extubation guidelines: ‘at-risk’ algorithm: | ||||||||||||||||||||||||||||||
 |
||||||||||||||||||||||||||||||
|
||||||||||||||||||||||||||||||
|
||||||||||||||||||||||||||||||
|
||||||||||||||||||||||||||||||
|
||||||||||||||||||||||||||||||
| Conclusion: | ||||||||||||||||||||||||||||||
| The DAS extubation guidelines promote the concept of an extubation strategy, involving a stepwise approach to planning, preparation and risk stratification, aimed at clear identification and management of patients ‘at risk’ during extubation. | ||||||||||||||||||||||||||||||
| SOURCE: Guidelines: Difficult Airway Society Guidelines for the management of tracheal extubation. Anaesthesia: Volume 67, Issue 3, pages 318–340, March 2012 | ||||||||||||||||||||||||||||||
| Further Reading: | ||||||||||||||||||||||||||||||
| 1. The Physiology of Extubation Failure: Podcast. | ||||||||||||||||||||||||||||||
| 2. The Pathomechanics of Extubation Failure. PulmCCM Journal. | ||||||||||||||||||||||||||||||
| How to dominate the Ventilator | |||||||||||||||||||
| How to dominate the Ventilator | |||||||||||||||||||
| Scott Weingart MD RDMS FACEP | |||||||||||||||||||
| Two Strategies of Ventilation | |||||||||||||||||||
|
|||||||||||||||||||
 |
|||||||||||||||||||
| Injury Strategy | |||||||||||||||||||
| Based on ARDSnet (ARMA Study-N Engl J Med 2000;342,1301-1308) | |||||||||||||||||||
| Mode | |||||||||||||||||||
|
|||||||||||||||||||
| Tidal Volume (Vt)=Protection | |||||||||||||||||||
|
|||||||||||||||||||
| Flow Rate (IFR)=Comfort | |||||||||||||||||||
|
|||||||||||||||||||
| Rate (RR)=Ventilation | |||||||||||||||||||
|
|||||||||||||||||||
| FiO2/PEEP=Oxygenation | |||||||||||||||||||
| Many ventilator evils would be fixed if these were on one knob | |||||||||||||||||||
|
|||||||||||||||||||
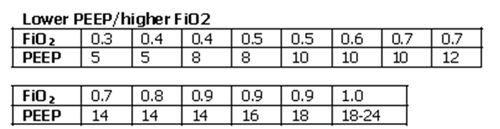
| OXYGENATION GOAL: PaO2 55-80 mmHg or SpO2 88-95% | |||||||||||||||||||
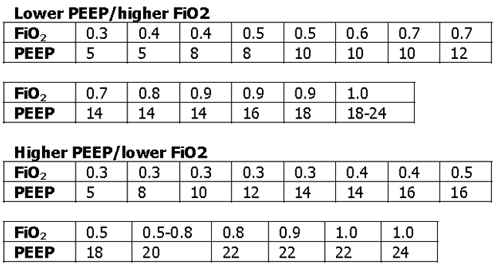
| Use a minimum PEEP of 5 cm H2O. Consider use of incremental FiO2/PEEP combinations such as shown below (not required) to achieve goal. | |||||||||||||||||||
 |
|||||||||||||||||||
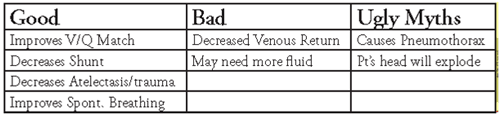
| Many doctors, even in specialties that should know better, are irrationally afraid of PEEP. | |||||||||||||||||||
 |
|||||||||||||||||||
 |
|||||||||||||||||||
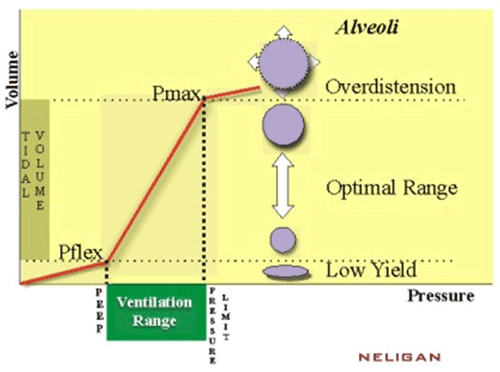
| Check Plateau Pressure | |||||||||||||||||||
|
|||||||||||||||||||
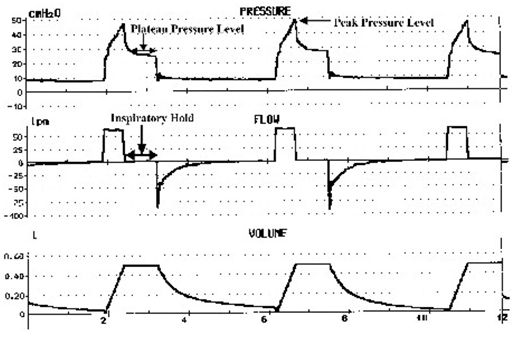
| Note: The plateau pressure is the pressure applied (in positive pressure ventilation) to the small airways and alveoli. The peak pressure is the pressure measured by the ventilator in the major airways, and it strongly reflects airways resistance. | |||||||||||||||||||
 |
|||||||||||||||||||
| The figure above is a waveform of a patient on volume control ventilation with a 0.8 second inspiratory hold. (Courtesy: Critical Care Medicine Tutorials) | |||||||||||||||||||
| Disadvantages of this strategy | |||||||||||||||||||
|
|||||||||||||||||||
| Obstructive Strategy | |||||||||||||||||||
| Goal is to give as much expiratory time as possible | |||||||||||||||||||
| Mode-Assist Control | |||||||||||||||||||
| Vt-8 cc/kg by PBW (Predicted Body Weight) | |||||||||||||||||||
| IFR-80-100 lpm | |||||||||||||||||||
| PEEP-0 | |||||||||||||||||||
| FiO2-use whatever you need, most folks are fine at 40% | |||||||||||||||||||
| RR-Start at 10 bpm. Look for I:E of 1:4 or 1:5 Adjust the rate to achieve this. | |||||||||||||||||||
| Permissive Hypercapnia | |||||||||||||||||||
|
|||||||||||||||||||
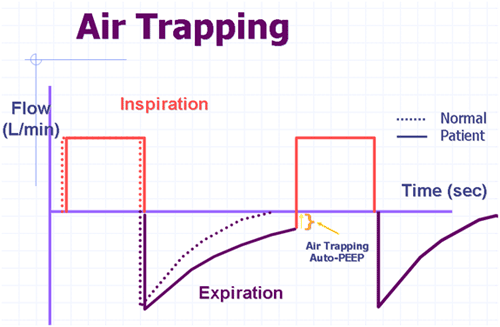
| AutoPEEP and Airtrapping | |||||||||||||||||||
|
|||||||||||||||||||
 |
|||||||||||||||||||
| Other Concerns: | |||||||||||||||||||
| Large Tubes: | |||||||||||||||||||
| At least 8.0 size ETT whenever possible, for both male and female patients. Pulmonary toilet and ICU care is miserable with small tubes. Biofilm forms within the first two days reducing tube size dramatically. | |||||||||||||||||||
| Ventilator Alarms: | |||||||||||||||||||
| Treat them like a code announcement. The closest person should run to the patient’s bedside and assess the situation. | |||||||||||||||||||
| Mechanical Ventilation Protocol Summary | |||||||||||||||||||
| NIH NHLBI ARDS Clinical Network | |||||||||||||||||||
| INCLUSION CRITERIA: | |||||||||||||||||||
| Acute onset of | |||||||||||||||||||
|
|||||||||||||||||||
| PART I: VENTILATOR SETUP AND ADJUSTMENT | |||||||||||||||||||
|
|||||||||||||||||||
|
|||||||||||||||||||
|
|||||||||||||||||||
| OXYGENATION GOAL: PaO2 55-80 mmHg or SpO2 88-95% | |||||||||||||||||||
| Use a minimum PEEP of 5 cm H2O. Consider use of incremental FiO2/PEEP combinations such as shown below (not required) to achieve goal. | |||||||||||||||||||
 |
|||||||||||||||||||
| PLATEAU PRESSURE GOAL: ≤ 30 cm H2O | |||||||||||||||||||
| Check Pplat (0.5 second inspiratory pause), at least q 4h and after each change in PEEP or VT. | |||||||||||||||||||
| If Pplat > 30 cm H2O: decrease VT by 1ml/kg steps (minimum = 4 ml/kg). | |||||||||||||||||||
| If Pplat < 25 cm H2O and VT< 6 ml/kg, increase VT by 1 ml/kg until Pplat > 25 cm H2O or VT = 6 ml/kg. | |||||||||||||||||||
| If Pplat < 30 and breath stacking or dys-synchrony occurs: may increase VT in 1ml/kg increments to 7 or 8 ml/kg if Pplat remains < 30 cm H2O. | |||||||||||||||||||
| pH GOAL : 7.30-7.45 | |||||||||||||||||||
| Acidosis Management: (pH < 7.30) | |||||||||||||||||||
| If pH 7.15-7.30: Increase RR until pH > 7.30 or PaCO2 < 25 (Maximum set RR = 35). | |||||||||||||||||||
| If pH < 7.15: : Increase RR to 35. | |||||||||||||||||||
| If pH remains < 7.15, VT may be increased in 1 ml/kg steps until pH > 7.15 (Pplat target of 30 may be exceeded). | |||||||||||||||||||
| May give NaHCO3. | |||||||||||||||||||
| Alkalosis Management: (pH > 7.45) Decrease vent rate if possible. | |||||||||||||||||||
| I: E RATIO GOAL: Recommend that duration of inspiration be < duration of expiration. | |||||||||||||||||||
| PART II: WEANING: | |||||||||||||||||||
| A. Conduct a SPONTANEOUS BREATHING TRIAL daily when: | |||||||||||||||||||
|
|||||||||||||||||||
| B. SPONTANEOUS BREATHING TRIAL (SBT): | |||||||||||||||||||
| If all above criteria are met and subject has been in the study for at least 12 hours, initiate a trial of UP TO 120 minutes of spontaneous breathing with FiO2 < 0.5 and PEEP < 5: | |||||||||||||||||||
|
|||||||||||||||||||
|
|||||||||||||||||||
|
|||||||||||||||||||
|
|||||||||||||||||||
| Ref: | |||||||||||||||||||
| 1. The 1. NHLBI ARDS Network, Lower Tidal Volume / Higher PEEP Reference Card | |||||||||||||||||||
| 2. EMCrit Blog: EMCrit Lecture – Dominating the Vent: Part I | |||||||||||||||||||
| 3. Critical Care Medicine Tutorials | |||||||||||||||||||


| Mechanical Ventilation in ARDS: 2014 Update | |||||||||||||
|
|||||||||||||
| Introduction | |||||||||||||
| People with acute respiratory distress syndrome (ARDS) are by definition severely hypoxemic, and nearly all require invasive mechanical ventilation. Yet mechanical ventilation itself can further injure damaged lungs (so-called ventilator-induced lung injury); minimizing any additional damage while maintaining adequate gas exchange (“compatible with life”) is the central goal of mechanical ventilation in ARDS and acute lung injury, its less-severe form. | |||||||||||||
 |
|||||||||||||
| Benefits of Low Tidal Volume Ventilation in ARDS: | |||||||||||||
| Low tidal volume ventilation (LTVV) reduces the damaging, excessive stretch of lung tissue and alveoli (so-called volutrauma), and is the standard of care for people with ARDS requiring mechanical ventilation. | |||||||||||||
| The meta-analyses including ten randomized trials total, have convinced most intensivist physicians that using low tidal volumes improves survival for people with ARDS. Taken together, the trials suggest that a strategy of low tidal volume ventilation (6-8 mL/kg ideal body weight) reduces absolute mortality by about 7-9%, as compared to using >= 10 mL/kg tidal volumes (~42% mortality in control groups vs. ~34% in the LTVV groups). | |||||||||||||
| How to Use Low Tidal Volume Ventilation in ARDS: | |||||||||||||
| The protocol from the ARMA trial can serve as a guide to performing low tidal volume ventilation for mechanically ventilated patients with ARDS: | |||||||||||||
|
|||||||||||||
| Ventilator adjustments are then made with the primary goal of keeping plateau pressure (measured during an inspiratory hold of 0.5 sec) less than 30 cm H2O, and preferably as low as possible, while keeping blood gas parameters “compatible with life.” High plateau pressures vastly elevate the risk for harmful alveolar distension (a.k.a. ventilator-associated lung injury, volutrauma). If plateau pressures remain elevated after following the above protocol, further strategies should be tried: | |||||||||||||
|
|||||||||||||
| As a last resort, neuromuscular blockade can be employed to reduce plateau pressure by eliminating patient effort, muscle tone and dyssynchrony. However, this approach has unquantified risks of long-term neuromuscular weakness and disability. | |||||||||||||
| Permissive Hypercapnia in ARDS: | |||||||||||||
| This single-minded focus on reducing plateau pressures derives from the likely survival benefit from low tidal volume ventilation and low plateau pressures observed in clinical trials (or if you prefer, the harmful effects seen from using “normal” or physiologic tidal volumes with resulting high plateau pressures in those trials). | |||||||||||||
| Achieving these low plateau pressures usually requires tidal volumes low enough to result in hypoventilation, with resulting elevations in pCO2 and respiratory acidemia that can be severe and to the treating physician, anxiety-provoking. This approach, “permissive hypercapnia,” represents a paradigm shift from previous eras, in which achieving normal blood gas values was the main goal of mechanical ventilation. | |||||||||||||
| How “permissive” can one be? Mechanically ventilated patients with ARDS appear to tolerate very low blood pH and very high pCO2s without any adverse sequelae (defying physicians’ anxieties based on intuition, training and medical lore): | |||||||||||||
|
|||||||||||||
| Conditions in which permissive hypercapnia for ARDS could theoretically be harmful include cerebral edema, mass lesions or seizures; active coronary artery disease; arrhythmias; hypovolemia; GI bleeding, and possibly others. These are hypothetical harms based on pathophysiology and not outcomes data, while the harm of ventilator induced lung injury and the benefits of a protective ventilator strategy in ARDS are real and known. The potential risks of hypercapnia in such patients must be weighed against the risks of ARDS, and therapy individualized. | |||||||||||||
| Limitations in Use of Plateau Pressure for ARDS: | |||||||||||||
| Patients with reduced chest wall compliance — most commonly due to obesity — may have higher plateau pressures at baseline and during ARDS than non-obese patients. It is possible that in some obese patients, titrating tidal volumes to plateau pressures < 30 cm H2O may be inadequate and result in worsened hypoventilation. There are no recommendations to treat obese patients with ALI / ARDS differently than non-obese patients with regard to mechanical ventilation. Esophageal manometry is considered superior to plateau pressures through its measurement of transpulmonary pressure, considered a more precise measure of potentially injurious pressures in the lung. Because it is invasive and the probes are prone to migration, esophageal manometry is not widely used. | |||||||||||||
| Prone Positioning in ARDS: | |||||||||||||
| Prone positioning (face-down) improves gas exchange and has long been used as an adjunctive or salvage therapy for severe or refractory ARDS. Prone positioning is gaining credibility as a new standard of care for ARDS after a multicenter trial published in 2013, demonstrated a dramatic near-50% relative risk reduction, and a 17% absolute risk reduction for mortality. Patients were kept in prone position for 16 hours a day in that trial, which was conducted at 27 European centers highly experienced with prone positioning for ARDS. The benefits of prone positioning have not yet been replicated in a large U.S. trial, but a meta-analysis of 6 randomized trials also concluded prone positioning saves lives in ARDS when added to a lung-protective ventilatory strategy. | |||||||||||||
| High vs. Low PEEP in ARDS: | |||||||||||||
| A strategy employing higher PEEP along with low tidal volume ventilation should be considered for patients receiving mechanical ventilation for ARDS. This suggestion is based on a 2010 meta-analysis of 3 randomized trials (n=2,229) testing higher vs. lower PEEP in patients with acute lung injury or ARDS, in which ARDS patients receiving higher PEEP had a strong trend toward improved survival. | |||||||||||||
| However, patients with milder acute lung injury (paO2/FiO2 ratio > 200) receiving higher PEEP had a strong trend toward harm in that same meta-analysis. Higher PEEP can conceivably cause ventilator-induced lung injury by increasing plateau pressures, or cause pneumothorax or decreased cardiac output. These adverse effects were not noted in the largest ARDSNet trial (2004) testing high vs. low PEEP. | |||||||||||||
| Predicting Survival and Outcomes After ARDS: | |||||||||||||
| In a 2012 retrospective analysis in JAMA including data from over 4,400 patients with ARDS enrolled in randomized trials, only the severity of hypoxemia (low PaO2/FiO2 ratio) was predictive of mortality. Commonly used clinical parameters of severity (static compliance, degree of PEEP, and extent of opacities on chest X-ray) were not predictive of outcome. A “high risk” patient profile with a 52% mortality was identified post hoc, comprised of severe ARDS (PaO2/FiO2 ratio < 100) with either a high corrected expired volume >= 13 L/min, or a low static compliance < 20 mL/cm H2O. Reviews of ARDS outcomes suggest that most people who survive ARDS recover pulmonary function, but may remain impaired for months or years in other domains, both physically and psychologically. | |||||||||||||
| Alternative / Rescue Ventilator Modes & ECMO in ARDS: | |||||||||||||
| Some patients with severe ARDS develop severe hypoxemia or hypercarbia with acidemia despite optimal treatment with low-tidal volume mechanical ventilation. In these situations, alternative, salvage or “rescue” ventilator strategies are often employed. Their common goal is to maintain high airway pressures to maximize alveolar recruitment and oxygenation, while minimizing alveolar stretch or shear stress. The most commonly used alternative ventilatory strategies are high-frequency oscillatory ventilation (HFOV) or airway pressure release ventilation (APRV or “bilevel”). HFOV is not appropriate as a first-line treatment for ARDS. | |||||||||||||
| SOURCE: | |||||||||||||
| Mechanical Ventilation in ARDS: 2014 Update: PulmCCM Updates. | |||||||||||||
| Further Reading: | |||||||||||||
| 1. ARMA Trial (N Engl J Med)- Ventilation with Lower Tidal Volumes as Compared with Traditional Tidal Volumes for Acute Lung Injury and the Acute Respiratory Distress Syndrome. N Engl J Med 2000; 342:1301-1308May 4, 2000. | |||||||||||||
| 2. Meta-analysis: ventilation strategies and outcomes of the acute respiratory distress syndrome and acute lung injury. Ann Intern Med. 2009 Oct 20;151(8):566-76. | |||||||||||||
| 3. Ventilation with lower tidal volumes versus traditional tidal volumes in adults for acute lung injury and acute respiratory distress syndrome. Cochrane Database Syst Rev. 2004;(2):CD003844. | |||||||||||||